Monday, May 30, 2011

More 3D Cellar Doors

I've been trying to be consistant in my 3D work and created these cellar doors. It's designed to be a sectional piece that you can put on the of a building I also set it up so that you could add a staircase beneath it so that you could open the doors to enter a basement.

To create the normal map I did a quick model of the doors panels and the bolted plates on top of them. I then Projected them onto the low poly model to create a normal map and ambient occlusion. I created the wood grain normal map in Crazybump and used it's mixer  to merge the projected normal map from 3DS max with the one made in crazybump.

The texture maps is a combination of a trim sheet and a unique unwrap. I used the trim sheet to make the door frame. While the door itself was a unique unwrap. I can also use the trim sheet side of  texture for other simpler props later like the wood can be used for wooden columns or wooden ladders. And the stone can be used for rocks and such. This can save time in a pinch when you need something textured for a level quickly.

Sunday, May 22, 2011

3D Work: Fire Hydrant

So I finished this project this weekend. A simple fire hydrant I projected the normal map from a high poly model in photoshop as well as an ambient occlusion map to help start my base texture. Once my base texture was complete I did quick lighting setup in Max and projected the lighting to the texture. 

On the normal map I painted surface detail in photoshop and then used Crazybump to make the surface detail and then used the mixer tool in Crazybump to combine the projected normal map from max with the normal map of the surface detail I had painted in Photoshop. I imported the finished product into the Unreal engine for the final lighting.

Thursday, May 5, 2011

Alien Paintings

Well I had the day off from work today which means I actually get to paint! I've been playing Mass Effect recently and I've been inspired to some space sci-fi stuff also I thought I would show a little bit of my process.


The first thing I like to do is start out with a drawing. I love to draw and that's usually where I come up with a lot of my better ideas. 

I like to do a rough paintover on the creature without any armor on so that I can start getting a grasp on what colors I'm going to use. This species evolved on a dark planet without much natural sunlight and thus has a dark blue skin tone. I put a splash of violet on the blue skin as that makes it look a little more alive. When painting human skin adding red to the skin makes it look more alive and healthy because there is blood flowing under there. With my alien I used that same logic, only there blood is purple rather than red.
After I do a rough paintover on the naked body I then design my armor. I try to make the armor colors unify with the creatures skin and I feel that was fairly successful.
 Once I have my base tones down I usually do light  Gaussian blur and throw a quick gradient on a separate layer with a layer effect In this design I used soft light. This gives me a rough starting point on where to take my lighting. 

With my lighting roughly started I collapse everything down and then begin painting in highlights and shadow and start painting the image with the lighting in mind. While it's not quite done yet, it's close.  theres still work to be done on the feet and hands. and then just some polish on the background.


Saturday, April 30, 2011

Hurray for Sprites and Game Maker!


So I picked up a new game editor this weekend, and have been playing around with designing sprites. Game Maker is a pretty neat little editor, it's pretty user friendly and by that I mean artist friendly, my knowledge of programming is fairly rudimentary but even I could stumble through it  without much difficulty. Before long I had a moving character and something that could be considered a game mechanic. I have strong interest in game design but my interest is mainly from an artistic perspective so when designing a game mechanic I'm always thinking "How cool would this look?"


Lilly is a ghost who has forgotten why she died, you must help Lilly traverse purgatory in search of the keys that unlock the gates leading out of purgatory and help her remember and find closure as to how she died. Along the way you will be hunted by the reaper of lost souls, seeking to send you to your final destination.

 The stone is a kind of symbolism, it's a physical representation of Lilly's guilt and the way I want her to move is as though she is constantly struggling to carry it with her. I know it's kind of a deep way for giving a reason, of why a ghost is carrying around a big rock, but why else would a ghost be lugging around a rock?
                                 
Game Maker is best used with sprites, so as I was learning it I was swapping between it and photoshop, painting up little sprite images as I needed them. I had the vision of the main character being a ghost that it is weighed down by a heavy stone tied to her, and the gameplay mechanic is built around the idea of lugging a heavy stone around a level while trying to outrun something. Essentially a platformer where your struggling to just barely escape. Sounds like a recipe for success and to be able to actually let my game designer friends play around with the mechanic rather than just drawing it out and trying to explain it is a definite plus.

As an artist with an interest in Game Design I'm looking for better ways to communicate my ideas, Thats really why I've choose to be a game artist, because a picture tells what thousand words can't, and it's just easier to communicate with a drawing then with a written description. Art's pretty awsome in how it communicates, but I think its important as a game artist to learn how a little bit about game design too and learn how to make functioning game mechanics even if it's only a basic knowledge, I think that makes it easier for the designer and the artist to work together and create a gaming experience that has a meaningful impact with the players

Creature Portrait

I was wanting something to paint this weekend and drew up a portrait for a creature. The idea behind the creature is that it is a cave dwelling reptile probably having evolved from a  puffer fish. It is about the size of  a dog and is bipedal it has venomous sacks along it's back with quills protruding from each sack that can inject large doses of the venom. It's something you would definitely regret running into.

Friday, April 22, 2011

Grim- Designing a Page and my Process: Part 1


So I just finished the black and white and first page of my web-comic, and I thought it would be a good idea to document my process and approach. In comics  I feel a picture should tell a thousand words, and one thing that I am striving for in this comic book project is to make each page have a strong visual impact, where the story could be told with as few words as possible.

Before getting started I did a rough scene break down of the pages, having written my story ahead of time, I already know whats going to happen so my next step is figuring out how to tell this story visually and in as few words as possible, comics are a visual medium and unlike books we have to show, not tell. Below is a breakdown of the first four pages. 


Something I've learned from movies is that you need to capture the audiences attention within the first 10 minutes or they will lose interest, action tends to work best. The Lord of the Rings trilogy does a great job of this with the war scene in the first movie, Gandalf fighting the Balrog in the second film, and Smeagol murdering his hobbit pal for the ring in the third movie. The first 10 minutes in a movie equate to about the first 5 pages in a comic book, so those first 5 pages have to be epic.

My first page is a medieval war scene with blood and action on every panel. It establishes the time frame and sets the overall mood of the story. The words don't really matter to me on this page the primary focus is the visual impact of each panel. For the page I did a series of rough thumbnails of each panel developing a composition within the panel while also thinking how each panel will develop the overall composition of the page. (I will discuss that a little bit later.) 
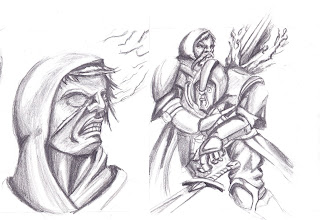
Once I have a plan developed I then go to work doing hand drawings of each of my panels. I love to draw so this is by far my favorite step in the process. I draw out each panel in my sketchbook very large and focus heavily on my facial expressions and dynamic poses. While the humans are drawn to be a little more realistic and serious than my animal characters, I still keep a somewhat cartoon like stylization to them because it is a story with talking animals and fairy tale subject matter, and to make them too realistic would cause them feel out of place in the universe. I did a lot of concept work before this stage so drawing in this style feels pretty natural to me at this point so all of these detailed drawings probably take about a day to complete.

 After finishing my drawings I then get them ready to compose on a page. From my thumbnails and roughs I already know how my page is going to work compositionally and I've drawn each panel to help that overall composition. Each panel is designed to encourage you to move your eye around the page and if you follow the arrows on the image below you'll see those deliberate decisions in action.

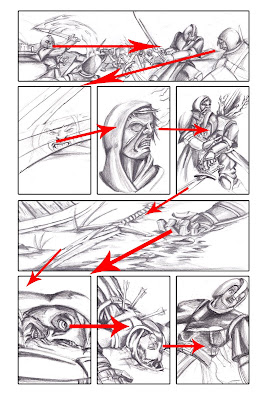
So following the arrows from top to bottom.
The sweep of the blade killing the first soldier pushes the eye towards the left, to look the soldier to the far right. The soldier on the right is looking at a downward angle towards the second panel. 

The blade with the soldiers reflection  on the second panel has a slight curve that draws the eye to the third panel of the soldier getting his face cut. The soldier turns his face to the right drawing the eye to the fourth panel of the soldier getting impaled.

The soldiers drops his blade and it's angle draws the eye to the fifth panel where both the dead hand and the blade are pointing towards the fifth panel. The soldiers slack dead eyes in the fifth panel are looking up towards the next body shot with arrows and the man impaled by arrows is looking towards the dead body to the right. 
Finishing the page.


Being a huge fan of comic books, I put a lot of thought in just how I would go about telling a story, and it's always satisfying as your hard work starts to take shape. My next post will be discussing color and painting techniques. 

-Matt

Sunday, April 17, 2011

Grim-Longshadow W.I.P

This is some more work with the Grim project. This is one of the main characters of the story, Longshadow, a mink. Longshadow is a bloodthirsty little fellow with a strong distaste for humanity. Named for his jet black fur Longshadow does his best work at night, slinking his way behind enemy lines in the moonlight. 

Longshadow's disgust for humanity is stemmed from trappers and their viewing his hide as a valuable commodity. Having lost brethren and family to traps and snares has left a bitter taste in the mouth of this member of the weasel family, and has left him bitter and resentful.of all humanity, even those humans of like mind that work towards a similar cause.

 Though surly, and unwavering in his distrust for humanity, Longshadow is still of good nature, and is able to put his own racism aside and work side by side with even those he hates most, if for a cause that benefits the greater good. But these alliances are temporary, and when the dust clears so too does the alliance end, and any wrongs  committed to this black furred rogue, will be answered for, with blood if necessary.

This painting isn't one of my favorites, I've come to realize that I'm going to need to revisit the design perhaps or perhaps even scrap everything and draw him all over again. After painting the rat I realized that this design just isn't meshing well with the style that I want to present. I realize the armor just isn't working and it has to change. I got alot of practice with this painting though and thats always a good thing.